Saturday, April 29, 2017

Rudolph Daze.... :)


Hi, Friends....

Yes, I am here with a card for Scrappy Mo's April Rudolph Days. I haven't kept up with my goal of making Christmas cards throughout the year, so her challenge is always a good reminder! You still have a couple days to join in. It's Anything Goes Christmas. Easy and fun!

I did the "Daze" thing up there in the title because I got sooooooo inspired that I made a series of 5 cards with some fabulously sparkly reindeer ornaments I found at the dollar store back at Christmastime. I am ashamed to admit that they have been sitting on my craft desk since December!!!! I am sooooooo serious! I was afraid that if I put them away I would forget about them. Hooray that I am finally using them!
(They were so much fun that I used all five that came in the package for a buck.....heh heh.....buck/reindeer....get it? Ha!!! Yes, I am a bit loopy from this sinus infection that I am fighting!!!)

I used some decidedly non-traditional patterns and colors for my cards, but I think they work. Each uses one of my double-embossed backgrounds that I already had on hand. This is my absolute favorite embossing technique where I dry emboss a piece of cardstock, then brayer Versamark over the textured parts, then sprinkle on embossing powder and zap with my heat gun. 

 
#1 - White panels on each of my cards are cut with Sizzix - Fancy Labels die set and then dry embossed.  I used my Darice - Snowflakes folder on most of them.
Sometimes when I double emboss, I smoosh Versamark over the entire surface and heat emboss with one color and then brayer Versamark over the textured surface and heat emboss with a second color. That's what I did with this background, which has pink powder over fuchsia cardstock (now hidden) and then a warm-tone silver powder heat embossed over the textured ridges from the Darice - Diagonal Stripe Background folder. It was hard to get a focused photo and still get all the glimmer and shine.  

Here are the others I made of the same design with only a few slight variations:
#2 - Double embossed background is brayered with Versamark and heat embossed with sparkly white powder.

#3 - Background is the same as #2 with a slightly different color of cardstock used.
 
#4 - Background is double embossed using my Darice - Interlocking Circles folder and heat embossed with sparkly white embossing powder.
 
#5 - Background same as #4 except I used my Darice - Snowflakes and Flourishes embossing folder.  The white panel is dry embossed with my Darice - Wood Grain folder.

Are you in a Reindeer DAZE, yet???? Hope you liked my sparkly cards....even in their non-traditional colors and patterns.  Thank you for all your kind comments. Your visits to my blog brighten my day!!!
 

<3
Janis


Thank you for the honor of entering this card in the following challenges:
1. April Rudolph Days at Scrappy Mo's - AG Christmas
2. Crafty Hazelnut's Christmas #331 - Anything Goes Christmas (opt. Stars)
3. ABC Christmas Challenge - H is for Home, I is for Informal (I used some Informal polka-dot patterned paper for my Christmas card.) 
4. Allsorts Week 413 - Embossing
5. Simon Says Stamp Wednesday Challenge - Anything Goes

6. Crafty Hazelnut's April Patterned Paper Challenge
7. HIMCR Challenge #299 - Freestyle
8. Wow! Embossing Powder April Challenge - Favorite Embossing Technique
9. DL.Art - April Linky Challenge

Friday, April 28, 2017

Stamped Floral Background in DI - Winnie & Walter

TOO CLOSE TO HOME!!!  What is with the snow I woke up to this morning????  Can somebody please hand the weatherman a calendar!!!

Hi, Friends......

Did you miss me?  Did you miss me?  Did you miss me? 
(That's for my fellow Sherlock fans!)  Did you even notice I was MIA?  lol... Probably not. That's okay. :)

I have really been hit with these spring viruses. Between being sick (twice!) and Easter activities and then being sick again (third time this month!), I feel like I have missed out on most of the little bit of spring weather we have had here. It's not very springy today, though.....snowy and rainy, instead. So I guess spring still isn't quiiiiiiiiiiiiiite here, yet. I'm sure looking forward to warmer weather!! Are you having nice spring weather where you are?

Today, I am sharing a card I started making weeks ago and finally got feeling well enough to finish. I made it for a couple of different challenges on the Winnie & Walter blog:


1. April Color Combo Challenge with Heather H. (Ends May 5) - I am playing Just For Fun this month, since I was the lucky winner last month! (THANK YOU, W&W!) I just couldn't resist the gorgeous color palette that Heather H. chose:


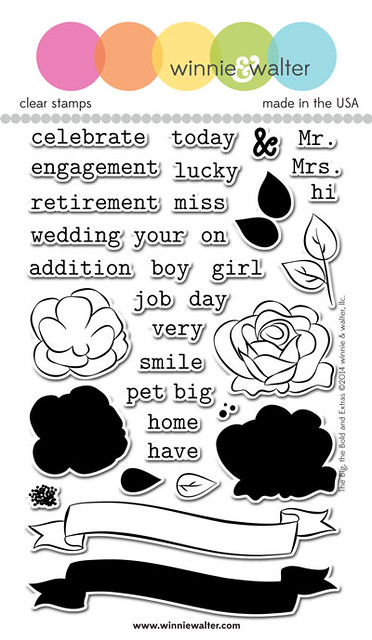
2. Winnie & Walter Rerun Challenge #18 - The Big, The Bold and Extras - I love W&W Challenges and their Reruns are always so much fun!  Their Rerun challenges are where they feature a stamp set from the past. The design team members make cards with this older set and Shay asks you to make a card using it, also. If you don't have the set, you can use a different W&W product to make a card inspired by one from the design team. Fun!!! (Ends April 30)


And....Shay even has a giveaway!!!
Comment on the Winnie & Walter Rerun Challenge and Giveaway post to have a chance to win this stamp set!! Wow!! Thank you, Shay!!!


Here's my card that was inspired by the bold frame in Vanessa's Rerun card found on this post.


I don't have the rerun set featured this month, so I used my Winnie & Walter - In Bloom: Hollie's Festive Florals stamp set to make a colorful background on watercolor paper with Distress Inks (Wilted Violet, Shaded Lilac, Faded Jeans, Lucky Clover, Bundled Sage, Cracked Pistachio, Scattered Straw, and Abandoned Coral) then I misted over the stamped images to let the colors bleed. After it was dry, I sponged additional color onto the background with some of the same inks.


Other supplies used include:
Winnie & Walter - Essentials: Audrey Cutaways die set for the scalloped panel and the XO borders.
Winnie & Walter - Sketchy Thoughts stamp set for setiment
Vellum and white embossing powder from my stash
Pretty Pink Posh - Sparkling Clear Mix sequins

Hope you enjoyed my card! I am trying to feel better so I can get some more crafting done. I have a little stack of half-done Easter cards on my craft desk that I ran out of energy to finish!!! I hope to get them done and stow away in my Easter supply box for next year. Please tell me I am NOT the only one who does this!! :)

Thanks for stopping in and I hope you have a great day!

<3
Janis


Thank you for the honor of entering this card in the following challenges:
1. Winnie & Walter April Color Combo Challenge with Heather H.
2. Winnie & Walter Rerun Challenge #18 - The Big, The Bold and Extras
3. Penny Black at All Sorts April Challenge - Spring
4. DL.Art - April Linky Challenge
5. Simon Says Stamp Wednesday Challenge - Anything Goes
6. Simon Says Stamp Work it Wednesday Challenge - April Showers Bring May Flowers

7. MarkerPOP Challenge #119 - Watercolor Florals

Friday, April 14, 2017

Guest Designer at Crop Stop - Week #2


Hi, Friends.....

I am back with the second of my two guest designer posts at the Crop Stop Blog . Thank you to Esther for this opportunity! This time I made a fancy, shabby style French card
with some of the wonderful products they carry in their online store.  This card is perfect for a mom who loves chocolate, flowers, and pretty pink things on Mother's Day. (Like my own dear mother did!  I wonder where I get it......LOL!)

HOW I MADE IT:
1. Cut and distressed edges of pink Core'dinations Pastel cardstock by sanding, roughing up, and inking with Distress Ink in Victorian Velvet. Cut and distressed edges of gray polka-dot panel from Glitz - Love You Madly by same process except no sanding.
2. Cut lace panel to fit over grey panel.
3. Stamp JustRite image onto cream paper from my stash. Die cut with Sizzix Fancy Label Die. Ink edges with Distress Ink in Victorian Velvet. Stamp over image with texture stamp from same set using Distress Ink in Spun Sugar.
4. Die cut Memory Box Gwyneth Flourish from DCWV Mercury Glass Stack in Metallic Silver.
5. Die cut MFT Eiffel Tower in same cream cardstock and in Gray from Core'dinations Neutrals pad. Glue together slightly offset for dimension.
6. Glue together the panels, the focal image panel, and the Flourish die cuts. Tie the crinkle seam binding ribbon on left edge.
7. Attach centers to the flowers. Glue down the pink flowers.
8. Use Scotch Foam Mounting Tape to attach Eiffel Tower over the top of the pink flowers. Glue ivory flower over edge of Eiffel Tower.

PRODUCT LIST:
Available from Crop Stop:
Glitz - Love You Madly 6x6 Paper Pad
Core'dinations Pastels Cardstock
Core'dinations Neutrals Cardstock
Memory Box - Gwyneth Flourish Die
Distress Ink - Victorian Velvet
Scotch - Foam Mounting Tape

Companies, but not exact product, carried by Crop Stop:
Distress Ink - Spun Sugar
JustRite - Greetings From Paris stamp set
My Favorite Things - Eiffel Tower die
Prima - Wildflowers
Tsukineko - Versafine ink in Smokey Gray
Sizzix - Fancy Labels die set
Core'dinations Sand-It Tool (CS carries the refills HERE)

Other products:
DCWV - Mercury Glass Stack
Want2Scrap - Adhesive Pearls

Hope you enjoyed my card. Thank you to Esther at Crop Stop for inviting me to Guest Design. It was an honor! I hope each of you will join in Crop Stop's fun monthly challenge for April!!!

<3
Janis


Thank you for the honor of entering this card in the following challenges:

1. Memory Box Challenge #23 - Celebrating Mom
2. DL.Art - April Linky Challenge
3. Penny Black at All Sorts April Challenge - Spring

4. Crafty Hazelnut's April Patterned Paper Challenge
5. Word Art Wednesday #278-279 - Anything Goes Family Friendly 
6. Craft Stamper TIMI April Challenge - AG 
7. Time Out Challenge #81 - Inspiration Photo
 (I used  pink and metallic silver, along with lots of swirls, which I interpreted as tendrils instead of butterflies.)


8. Simon Says Stamp Wednesday Challenge - Spring Color Inspiration
(I used the pink from the palette and daisies from the photos)


Sunday, April 9, 2017

Classy Vintage Lady Birthday Card


Hi, Friends.....

I am here to share a fun card I made especially for a couple of challenges:


1. Paper Crafter's Corner Magazine Monday Challenge Week 169 - This is a last-minute (almost literally!!) entry into this fun challenge.On Mondays, we are given a vintage magazine cover to inspire us. This week we can draw inspiration from any part of the cover. I chose the swanky lady and the "horns".


2. Simon Says Stamp Wednesday Challenge - Happy Birthday. This is in honor of their Wednesday Challenge's 8th Birthday!! They have EIGHT prizes up for grabs this week, so be sure to join in.

Here's what I made:


For my card, I used a classy vintage woman from the Graphic 45 Times Nouveau collection. Instead of "horns", I used my Memory Box - Gwyneth Flourish with lots of tendrils and a piece of the rose gold cardstock from my DCWV Mercury Glass Stack . LOVE!! My sentiment is from the Altenew - Label Love stamp set and stamped in Versafine - Majestic Blue ink. The patterned paper is a scrap from my stash. I inked the edges of my panels with Distress Ink in Walnut Stain.

That's all for now. Thank you for stopping by. I especially appreciate all your kind words on my recent guest designer cards!!!

<3
Janis


Thank you for the honor of entering this card in the following challenges:
1. Paper Crafter's Corner Magazine Monday Challenge Week 169
2. Simon Says Stamp Wednesday Challenge - Happy Birthday

3. Bizzy Bec's April Challenge - Anything Goes

Friday, April 7, 2017

Guest Designer at Crop Stop - Week #1


Hi, Friends......

I am very excited and honored to be the Guest Designer over at the Crop Stop Blog for the next couple of Fridays! If you are unfamiliar with Crop Stop, you really must take a look at their wonderful online store and their blog!!


YOU WILL WANT TO READ THIS VERY EXCITING INFO ABOUT CROP STOP:
I'll just say that Crop Stop has FANTASTIC prices on so many of their items......and very inexpensive shipping. In fact, they have flat rate shipping of only $4.00 to USA addresses on as many clear stamps, stencils, wafer thin dies, and/or embossing folders as you want to order!!! Mix and match and order a ton. Only $4.00 to ship in the USA!!!.......unless you order over $50...then shipping is FREE!! WOW! WOW! WOW! Even their world-wide shipping is very reasonable!!

And, that is not all..... Oh, no!! That is not all.....
The embossing folder that I am featuring today is on sale for only $1.00!!!! In fact,
Crop Stop has a bunch of gorgeous embossing folder designs (I think I counted 10!) on sale for $1.00. You can order one (or more) of each and every one of them and still only pay $4.00 shipping. That would be 10 embossing folders for $14.00 INCLUDING shipping in the USA!!! If you can beat that anywhere, PLEASE let me know!!!

Okay, on to my card..........

I was the lucky winner at the Crop Stop Blog Monthly Challenge a while back and Esther invited me to guest design using something from my prize, which I was glad to do as a thank you for the lovely gift!!!


Here is the description I sent to Esther about my card:

How I Made It:
1.  Dry emboss Core'dinations cardstock with "Smooch" embossing folder and sand with Core'dinations Sand-it Tool.  Die cut with Lawn Fawn Stitched Rectangle die.  Add shimmer in parts of the design with Wink of Stella clear marker.
2.  Stamp sentiment from Waffle Flower Welcome Spring with Altenew Crisp Inks in Ocean Wave on white cardstock.  Die cut with My Favorite Things Stitched Oval die.
3.  Die cut watercolor background (from my stash) with Winnie & Walter Pierced Rectangle die from the Essentials: Katharine set.  Sponge Distress Ink in Evergreen Bough on edges of the background and wrap and tie Baker's Twine around left side.  Glue background on to white card base.  Glue embossed panel to background. 
4.  Put Scotch Foam Mounting Tape to back of sentiment panel and attach to card.  Add Petaloo flowers.

Here's a close up so you can see the shimmer from the Wink of Stella better:


PRODUCT LIST:
Available from Crop Stop:
Couture Creations "Smooch" Embossing Folder (prize)
Core'dinations Pastels Cardstock
Distress Ink - Evergreen Bough
Companies but not exact product carried by Crop Stop:
Lawn Fawn Dies - Large Stitched Rectangle Set
Core'dinations Sand-It Tool   (CS carries the refills HERE)
My Favorite Things Dies - Stitched Ovals
Petaloo - Color Me Crazy Flowers

Other products:
Waffle Flower Welcome Spring stamp set
The Twinery - "Caribbean" Baker's Twine
Winnie & Walter - Essentials Katharine die set
Altenew Crisp Inks - Ocean Waves
Wink of Stella Clear Marker

A big thank you to Esther and everyone over at Crop Stop for the opportunity to Guest Design. Check back here next Friday for my other card that I made for them. Have a lovely day!!!

<3
Janis


Thank you for the honor of entering this card in the following challenges:
1. Cardz TV Designer's Challenge #6 - Anything Goes
2. DL.Art - April Linky Challenge
3. Penny Black at All Sorts April Challenge - Spring

4. Bizzy Bec's April Challenge - Anything Goes

Wednesday, April 5, 2017

Butterfly Challenge - Guest Designer Post


Had to use this meme since I am including my mini-bio today!!  lol...


Hi, Friends.....

I am very excited today to be the Guest Designer over at Mrs. A's Butterfly Challenge! Butterflies and spring just seem to go together, don't they???

Mrs. A requested a little bio, so here's what I wrote up for her to use:


Hi, Friends! My name is Janis Woolbright and I blog at Her Peaceful Garden. My hubby and I live in rural N. Central Idaho in the USA. I am mom to two grown kids and grandma to one precious granddaughter. Currently, we have 5 chickens and 17 or so cats. (Whiskers kept jumping into my arms while my son was taking some photos of me for this bio, so I let her join me.)

I have been crafting in some fashion since I was a kid, but started rubber stamping around 30 years ago. That hobby mostly got put on hold while the kids were growing up and I was homeschooling. When I took it back up, what a surprise to see the transformation papercrafting had experienced!

I started blogging in 2014 and have really grown as a cardmaker.....learning from the projects that many of you reading this right now have shared. My sincere thanks to you all!! My style is pretty varied, but I like to think that two words describe my crafting: playful and experimental. I love making a mess with my supplies and trying new things. :)

Many thanks to Mrs. A for her lovely Butterfly Challenges and for inviting me to be a Guest Designer!!
The theme for the Butterfly Challenge this fortnight is: Butterfly + W is for Window &/or R is for Rose (the color). The color part was easy because I love pink and could use red-pink tones for it.....but the windows part had me a bit stumped. Then I remembered my DRS Designs - Small Stained Glass stamp and decided to dust it off and try it out.


There are several methods of using stained glass stamps....but, as you might predict, I chose the messy, goopy way which is sooooooo much fun!!!! Ha. I stamped my thrift store butterfly image on a generously-sized piece of white cardstock in Versafine - Onyx Black ink and then stamped my stained glass pattern stamp over the top of it. Next, I colored it all with my Spectrum Noirs. Then I smooshed Versamark over the entire image and dumped on some clear Ranger - Ultra-Thick Embossing Enamel.

Oh, it has been many moons since I have played with my ooey-gooey UTEE! I am an alchemist at heart and this stuff is a mad-chemist crafter's dream!! I zapped the first layer of UTEE with my heat gun and then repeated the process until the entire panel was covered in a delicious, thick glossy coat.


[Note: Naturally, you want to do the heat embossing part of the technique before trimming your window to size so you have something to hang on to while your UTEE melts all over the place. Use a tool like a wooden clothespin (my preference) or tweezers because UTEE gets HOT!!]

After my panel was cool, I cut it out and bent it repeatedly to crackle the UTEE. Then I sponged Distress Ink in Walnut Stain over the cracks to give an aged appearance. It's subtle, but I think it adds to the look.

Other supplies used:
Spellbinders - Heartfelt Creations - Raindrops on Roses die set
Scraps from my stash

Sheer black ribbon from my stash

That's all for this post!  Hope you enjoyed this spring card. I can't wait to see butterflies fluttering around outside my windows! I hope you are inspired to play along with the Butterfly Challenge. Thank you, again, Mrs. A, for the chance to Guest Design. It was a lot of fun.

<3
Janis


Thank you for the honor of entering this card in the following challenges:
1. Cardz TV Designer's Challenge #6 - Anything Goes
2. DL.Art - April Linky Challenge
3. Crafty Hazelnut's April Patterned Paper Challenge
4. Wow! Embossing Powder April Challenge - Favorite Embossing Technique
5. Penny Black at All Sorts April Challenge - Spring

Monday, April 3, 2017

Rose with Butterflies in Midnight Blue and Gold


I always chuckle when I see memes with cats and TP because I have (at least) one who loves to claw at the rolls, too. I don't know which one(s) it is or when he does it, but I find it torn up all the time. I suspect SkippyJon! Here is a shot I just took of some of his handiwork:


You'd think eventually we'd get smart and keep the TP on a shelf that they can't easily reach.....but, nooooooooo! Like all tolerant cat-lovers, we just shake our heads and let them keep on destroying our house and all of our belongings! Ha!!!

Hi, Friends......

I am here to share a card with you that I made inspired by several challenges:


1. Mrs. A's Butterfly Challenge #75 - Butterfly + R is for Repeat and/or N is for Night Sky (the color). For the "R is for Repeat" portion of this challenge, she asks us simply to repeat an element somewhere on our card. I put sequins on two corners of mine. Night Sky is open for interpretation so I went with a Midnight Blue color. This is a last minute entry into this challenge since it closes in just a few hours.


2. Mojo Monday #491 Sketch Challenge - Julee has given us another fabulous sketch to play with!! Yay!! (Ends April 9)


3. Winnie & Walter Rerun Challenge #18 - The Big, The Bold and Extras - I am very excited to see that W&W has another challenge up and going already!! Their Rerun challenges are where they feature a stamp set from the past. The design team members make cards with this older set and Shay asks you to make a card using it, also. If you don't have the set, you can use a different W&W product to make a card inspired by one from the design team. Fun!!! (Ends April 30)


And....Shay even has a giveaway!!!
Comment on the Winnie & Walter Rerun Challenge and Giveaway post to have a chance to win this stamp set!! Wow!! Thank you, Shay!!!


4. Darnell's April Fool's Boo-Boo Hop and NBUS #11 - This is a Just For Fun hop where we are asked to link up a card that has a Boo-Boo in it and/or that uses some Never Before Used Schtuff. (Ends April 11)


Here's what I made.......


For my NBUS item, I used my DCWV Mercury Glass Stack. I am soooooooo IN LOVE with this super-shiny marbled cardstock in metallic gold, rose gold, copper, and silver that I had to buy 2 extra pads before I could use any of my first one!!! lol....

(I wasn't planning on this being a boo-boo card, but one of my dies slipped when I was making my cuts and the tip of the leaf next to the flower was cut off. I fixed it with gel pens, but you can still barely see in the photo that the tip is shinier than the matte outline.)

This rose is from my most favorite-est, most beautiful-est, most gorgeous-est of all my die sets from Winnie & Walter (and I have quite a little stack of them!).....their Winnie & Walter - In Bloom: Maggie's Roses Cutaways die set. I LOVE IT SO MUCH!!! It's not the one I use the most....but every time I use it, the beauty and elegance of the magnificent rose just shines through so brightly!!


This die set just so happens to have the same roses that are in the featured Rerun set: The Big, The Bold and Extras, but Shay had not mentioned this as a "qualifying set" to get creative with so I still based my card on inspiration from one of the designers. I decided to use a blue outline on the rose just as Lydia did in her gorgeous stamped roses here.


Other supplies used include:
Winnie & Walter - Essentials: Audrey Cutaways die set (for the tiny butterflies)
Pilot - Metallic Gold Extra Fine Tip Marker (for markings on butterflies)
Distress Ink in Chipped Sapphire (for edges of panels)
Faceted blue rhinestone and large gold sequins from stash
Scraps from my stash for panels. (BONUS: These little butterflies and leaves are small enough to cut from the leftover bits and pieces from other die cuts. Yay!!)

I think that is all for now. Thank you so much for stopping by! Your comments make my day!! Please join in these challenges with me, too.

<3
Janis


Thank you for the honor of entering this card in the following challenges:
1. Mrs. A's Butterfly Challenge #75 - Butterfly + R is for Repeat and/or N is for Night Sky
2. Mojo Monday #491 Sketch Challenge
3. Winnie & Walter Rerun Challenge #18 - The Big, The Bold and Extras
4. April Fool's Boo-Boo Hop and NBUS #11
5. Simon Says Stamp National Crafting Month Challenge - Anything Goes
6. Simon Says Stamp Wednesday Challenge - Anything Goes
7. Cardz TV Designer's Challenge #6 - Anything Goes
8. Pixie's Snippets Playground Week #275-276 - Use Snippets
9. DL.Art - April Linky Challenge
10. Crafty Hazelnut's April Patterned Paper Challenge